Saturday 21 July 2012

CRAFT DIY - Hand carved stamps


I love rubber stamps. There is so much you can do with a simple stamp; you can make cards, make gift wrap, jazz up a diary or notebook. Lately I have seen so many blog posts dedicated to hand carving your own designs, and it is so simple to do. It is also really cheap, the most expensive thing you have to buy is the carving tools. Mine are by speedball, and I got the tool with 2 nib sizes from amazon for less than £10. Then you can get plain rubbers (yes, the kind you used back in school!) and literally draw your design on and carve away!
Tools!!! My Melody craft knife, speedball stamp carving tool, pack of white erasers from the £1 shop

You can make simple tiny shapes using the eraser on the end of a pencil! Perfect for geometric shapes!

Stamps! 2 washi style patterns, an owl and a bow
Practicing :) You can see my original owl picture too
Mr and Mrs Owl gift tag


For some more detailed tutorials and to see where I got some inspiration from, check out these fun links!

Sampler page!
xoxo

Selfridges rooftop crazy golf

Recently I experienced the Bombas and Parr crazy golf which is on the roof of Selfridges, Oxford Street for summer 2012! It was really funny - the theme is 'cake holes' and has famous London landmarks dressed up as cakes for each golf hole. It was only about £6 and although tiny, it did take a while to go round each hole!
The floor was all fake grass and the rooftop was decorated with sun loungers and an iconic London phone box!
There is also a beautiful roof top cafe serving afternoon tea and jellies - it is a tad on the pricey side but if you are going for a special occasion then it is a lovely place to splash out and celebrate!
The gorgeous interior - bunting and eclectic wall art

 I would really recommend going if you have the time - you can order tickets online or they do have a few spare tickets on the day. More information can be found on their website here.


I only wish it had been a bit more sunny! But overall a really fun experience - especially if you go with some good friends who laugh with you when you are terrible and hit your ball in the water :)


I love this guy!


xoxo

Monday 16 July 2012

CRAFT DIY / Hot air balloon card

This tutorial is for a card I made last week for one of my best friend's birthdays. She has mentioned to me many a time her love of hot air balloons so I wanted to make something whimsical but pretty to make her smile. I am really in love with Kraft card at the moment, I love the contrast it brings to pretty papercraft projects; it really allows your embellishments to stand out. I am also an avid fan of loose glitter - it is such an easy way to make papercraft projects feel SO special with really no effort at all!


Step 1: Grab some nice card for stamping, your hot air balloon stamps and some ink. Stamp your  images and set aside to dry.
I use Versafine for all my stamps! I honestly haven't found a better product for getting crisp images (but please let me know if you have any other suggestions!). I find my stamped images come out so sharp and perfect, especially if it is a really detailed stamp. Versafine also dries really quickly so that is a major plus in my opinion! No one wants to be waiting hours for their images to be smudge free! The stamps I got were from here when I was at a stamp and scrapbooking show. They are on really handy mounts which make it easy to see what you are doing and have better control when stamping.

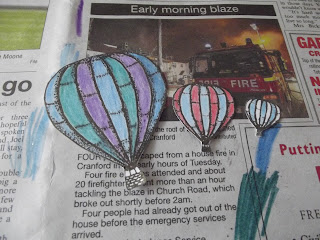
Step 2: When your stamped images are COMPLETELY dry - use your old school colouring pencils and colour them in! Carefully cut around :)
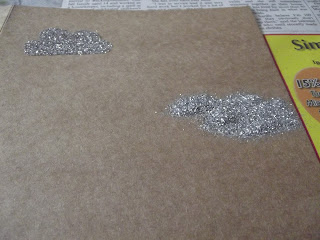
Step 3: Time to make some clouds! Draw a cloud shape with your glue and cover with loose glitter. Shake off excess!

I use a 'Sakura Quickie glue pen' in this kind of project because it is just like drawing with a pen, but instead of ink coming out you get glue! It means you can be pretty precise without glue getting everywhere (especially important for me because I am such a messy crafter!). They are pretty cheap - around £2.50, and last a long time. Don't forget to have a sheet of paper under your card so you can save and re-use the excess glitter!

 How pretty is this cloud!


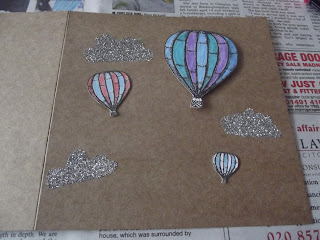
Step 3: Glue your hot air balloons around the clouds! I stuck the smaller two directly onto the card, and used 3D foam tape for the larger balloon. Because the other two are far away in the distance :)
 Yay for hot air balloons :) In other news I am still recovering from a weekend food coma... BBQ, cupcakes, cocktails and brunch! I am worn out from eating!


xoxo

Friday 13 July 2012

CRAFT DIY / luggage tag gift tag

 Today I whipped up a quick gift tag to go on a present for a friend's birthday. It only took a few minutes to assemble, The paint was such a thin layer it didn't take long to dry at all. I wanted to go for something soft and feminine but still had a bit of glitz. So many possibilities with this DIY - enjoy!

Close up of the gift tag. How pretty are those blooms!


This DIY is so simple all you need is a paper luggage tag, glitter paint and a brush, paper flowers, glue and crystal stickers. You can mix up the colours to suit your gift theme, I am going for blue and silver.


Tutorial
Step 1 : Paint a thin layer of glitter paint over your tag. I just painted the bottom 2/3.


Step 2: Once dry, glue on your paper flowers.

Step 3: Add a crystal sticker to the middle of each flower and you are done! Pretty :)


Thursday 5 July 2012

4th July cookie sandwich!

Today was my mum's birthday, and because it was also the 4th July I knew I needed to make something festive :). I ended up creating a super sugary but delightful chocolate chunk cookie sandwich. Fresh baked cookies filled with a strong vanilla butter cream and raspberries and strawberries.


Mixing up the cookie dough
 Freshly baked cookies!
 Yummy patriotic cookie sandwiches

Recipe (adapted from here)

Cookies
1/2 cup butter
1/2 cup golden caster sugar
1/2 cup soft dark brown sugar
1 large egg
1 tsp vanilla extract
1 1/3 cup plain flour
1 tsp baking powder
1/2 tsp salt
200g plain chocolate, bashed up into chunks

Buttercream
75g butter
175g icing sugar
1 tsp vanilla extract

+ strawberries / raspberries to garnish, as well as patriotic sugar stars!

Method

  • Set the oven to gas mark 5 and line a baking sheet with baking paper
  • Cream the butter and sugar until pale and fluffy
  • Mix in the egg and vanilla
  • In a separate bowl, combine the dry ingredients and then add slowly to the wet mixture until it is all incorporated into a thick dough
  • Grab your bar of chocolate and hit repeatedly with a rolling pin to break into chunks :) (alternatively you could just buy chocolate chunk pieces!!) and then stir through the dough
  • Grab a small handful and flatten on the baking sheet, this recipe should make 10 cookies, and therefore 5 cookie sandwiches! Bake for about 15 mins, set aside to cool.


  • To make the buttercream simply combine ingredients and whisk. It should be a fairly stiff mixture, but use drops of milk to loosen mixture if necessary.
  • To complete the cookie sandwich, simply layer a cookie, then buttercream, then fruit then a cookie on top! I added a drop of buttercream on top to hold the candle, and some blue and white icing stars.


Happy birthday mummy!!! xoxo

Monday 2 July 2012

Nails of the day - Lilac #G0 Marks and Spencers

I tried this new nail varnish from Marks and Spencers limited collection.


Now I have never tried Marks and Spencers beauty products before, and wasn't sure how good the quality would be for a £3.50 price tag. But it was actually really nice polish to use! Really easy application, it only took 2 coats for full opacity, and was quick drying. Nice finish, not gloopy at all. The colour is lilac with fine gold glitter which reflects the light beautifully.

The next time I need some nail varnish I will definitely check this range!

xoxo

Sunday 1 July 2012

Westfield

So this weekend I was feeling pretty ill, and I knew some retail therapy was the only way to get me back to myself.
I perused the sales at Westfield White City, and good god there is a lot on sale! Here is a sneak peek at some purchases.

 Marks and Spencers beauty range : Dreamy Days Eau de Toilette 10ml £3.50 / 25ml £6 / Lip balm £2 / Lilac #G0 nail varnish £3.50 / Hello Kitty nail kit £6 / Hello Kitty fragrance £3.50

Nail varnish from Kiko Milano: #249 £1.50 / #257 Silver Glitter Wisteria £1.50 / #398 Infinite Indigo £3.40

Teal jeans £9.99 from Pull and Bear / Pink jeans £10 from Republic.

Urban Outfitters : Whale oven glove £6 / Black skirt £14


Nothing like some bargains to cheer a girl up :)

xoxo